
Wednesday, October 30, 2013
Saturday, October 26, 2013
Up-cycled Microwave Tray ~ 3rd try!
The microwave tray transformation continues with this
3rd installment.

This one has cast glass dragonflies, butterflies, & fish as well as
fused glass pieces, blobs & beads.
Most of the glass is transparent although some of the beads
are opaque & add some contrast.
It's been hanging in the greenhouse without any problems
with gravity & temperature.
Friday, October 25, 2013
Fused Glass Raven Panels ~ Post Firing
Here's what the glass panels look like post firing.
All done & ready for hanging.

Tuesday, October 15, 2013
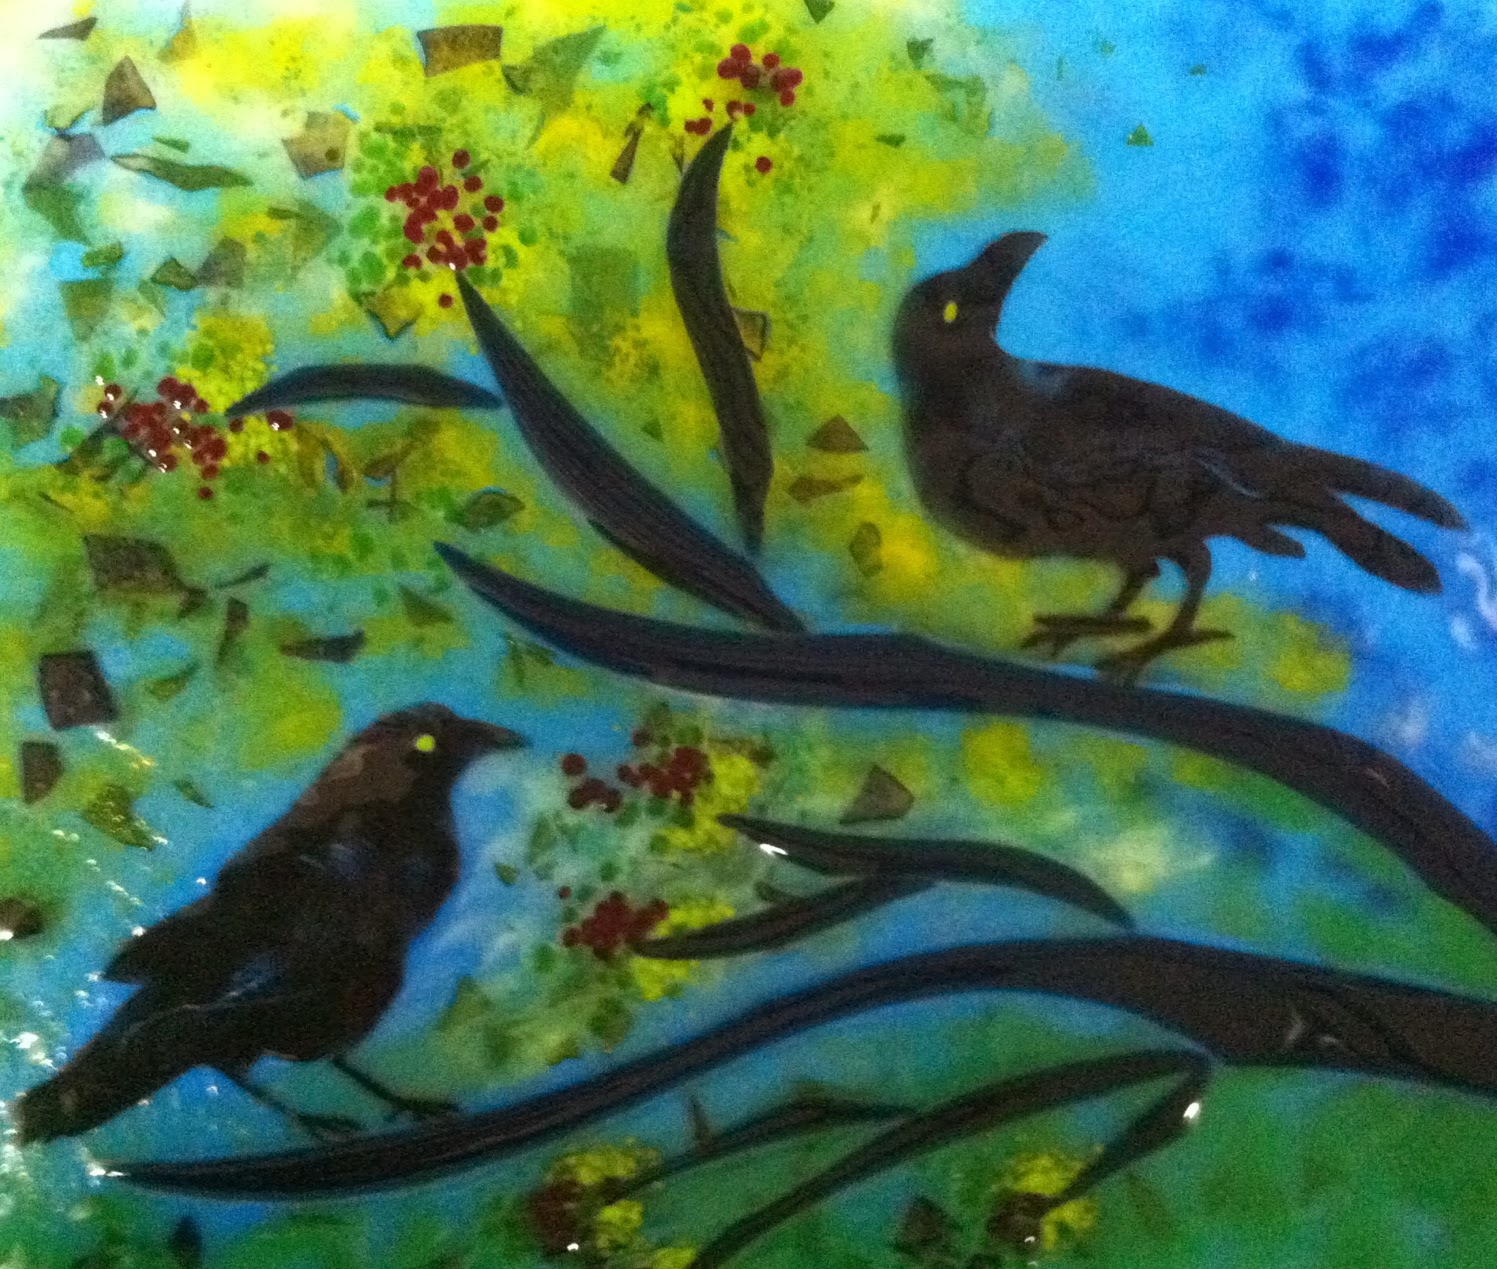
Raven Fused Glass Panels ~
Working on two large glass panels with ravens.

~ Two Ravens in a Tree ~
Pre-fire picture with multiple layers of glass, frit, & cut 3mm sheet.

Second panel pre-fired.
These birds are in the oven & will be cooked by tomorrow morning.
Wednesday, September 25, 2013
Upcycled Microwave Glass ~ Part 2
Here's my second attempt at up-cycling
a micro-wave glass tray.

This one looks like a giant pizza pie, too!
It looks better in person as there's lots of dimension that
doesn't show up in the picture.
I have 2 more glass trays & a gazillion ideas.
The next two will not be in this same mandala style.
Back to the Restore Store to see if they have any more of these trays.
This is very addictive.
Saturday, September 21, 2013
Glass Pizza ~?
I've been stalking the Habitat Restore Store in Anchorage.
It's almost as much fun as hardware stores & plumbing isles.
Lots of items I'm not familiar with that can be re-purposed into something else.
Wandering through the Restore Store, I came upon a big bin of old
microwave glass turn-tables. I wonder what the real name is for these glass plates?
I'm sure there's some weird, specific, parts name for them??
Like "ear nuts"... know what ear nuts are?
Anyway, these glass circles kept calling to me,
so after my third visit I decided to buy three.
I almost always buy things in 3's...
not sure why but I always do.

So here's the typical microwave glass tray.
If you break it & have to buy a replacement it'll cost
you $10 to $24. UGH!
That is unless you can buy it at the Restore Store!!

Here's one I purchased for $1.
I'm thinking I over paid because the last time I visited the
Restore Store I paid an average of 25 cents per item.
I guess art has a higher price?

So, I drilled some holes & added a stainless steel wire hanger.
and some glass bobbles & Ta-da!!

William called it a glass gumdrop & worm pizza!
It sort of does look like a pizza.
I'm thinking about adding black grout to give it
a stained glass look?
Yes?
Pictures tomorrow of it hanging in the greenhouse.
~ It's a circular, orb, glass sun catcher ~
NOT A PIZZA
Tuesday, August 13, 2013
Recycling Bullseye ~ the continuing saga...
The studio has been crazy busy & I'm blowing through the glass so
yesterday I needed to crack open a new case of
Bullseye Tetka.
These cases are tightly secured with metal straps,
packing paper, Styrofoam, screws....
YIKES, it's a process to get the lid off of a crate of glass.
Upon prying off the lid I had a nice (or not so nice)
surprise inside the box!

A wasp nest!
Just a little one.

Close up. You can see the comb inside but there
wasn't any larvae or bees around so it must be abandoned.
Good thing because these bees are vicious & not sweet like my honey bees.

Apparently, the wasps have found a way to recycle Bullseye crates too!
Thursday, July 18, 2013
Fused Glass Leaves....!
Winter, Spring, Summer & Fall....

I'm loving these small leaves!
They look so great with a variety of frit & fun to mix up.
Approximately 4" X 8".
These are a new addition to my aurora series &
will be available in August.
Friday, July 5, 2013
The Reds Are Running ~!
Yes, the salmon are starting to run & the Alaskans are getting fishing fever.
I haven't been fishing yet but I do have the fever.
For ceramic salmon that is...

I used to throw pots & create hand built items with clay until I got into glass but
every once in a while I pull out the clay & glazes & go crazy.
I think William's been my influence as I've been helping him
with his salmon & halibut pins.
That is when he's not hiding out in the greenhouse

or playing golf.

He's a golfing dude!
Thursday, March 7, 2013
Upcycled Wedding Dress ~ Done!
The Wedding Dress Project
is DONE ~!
I know.....you're probably thinking....
FINALLY!
Yea! She's Dooooone!
FINALLY!
Yea! She's Dooooone!
Here's a few shots of the details.

Floral shoulder strap.
Little ladybug accent.
Little ladybug accent.
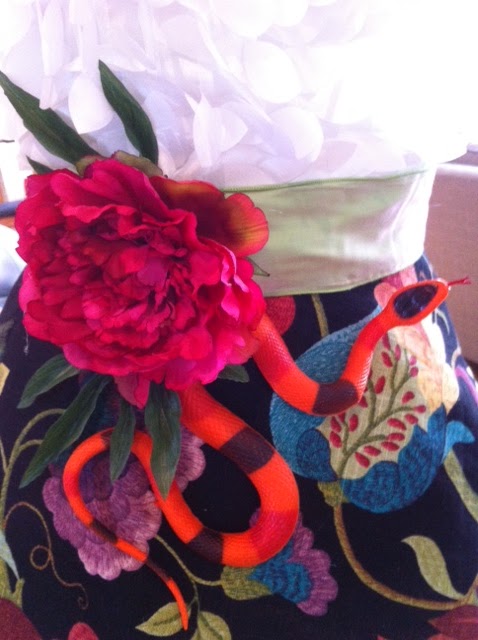
Waist detail with snake & large peony.
White polka dots with letters....which spell...
Transformed...
Transformed...

Treasure...

The completed piece.
There's lots more inspirational words/phrases & bugs/insects on the skirt
but I was too lazy to take pictures & post.
I upcycled the head piece & it turned out kind of cool.
More ladybugs, bugs, snakes etc.
The dressform was out fitted with zebra duct tap.
Sooooo, Alaskan ~!
The title?
~ NEW LIFE ~
There's lots more inspirational words/phrases & bugs/insects on the skirt
but I was too lazy to take pictures & post.
I upcycled the head piece & it turned out kind of cool.
More ladybugs, bugs, snakes etc.
The dressform was out fitted with zebra duct tap.
Sooooo, Alaskan ~!
The title?
~ NEW LIFE ~
Wednesday, February 27, 2013
Upcycled Wedding Dress ~ Part 5
This has been such a fun project.
I was sort of thinking I was close to being done
but as I was looking at the dress on the mannequin
I decided it probably had more life to it.
First, however, it's getting the equipment ready for work.
When I was a kid my Mom, Grandmothers, & Aunts would gather to quilt around
the quilt frame that was almost always set up in our basement .
It was a large frame that belonged to my Grandma Johannes & made by Grandpa.
Grandma J had tacked a doubled over piece of fabric all along the length of each strip of wood. The bottom, batting & top of the quilt was pinned to this fabric.
As a child, I remember having to thread needles & line them up
along the edge of the quilting frame. As the quilters worked across the quilt
they never had to stop to thread a needle. They would just pull another needle
with thread & continue on.
At the time, I thought it was a speed thing.
NOW... I know it's an eyesight thing.
Those tiny little holes in needles are hard to see!
So... I've employed my own system.
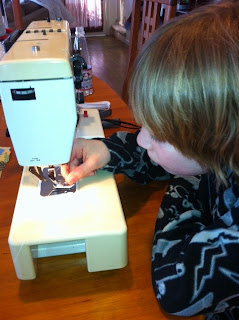
Here's William.
Threading my sewing machine.
Yep ~ I can't thread the darn needle except by accident
or if I wear my new bifocals.
Good Grief ~!
I had the other half of the skirt (that I used earlier for a hooded cape).
But, hey, since I have another half I might as well make another cape, right?
So, this will be a short cape.
With a tulle collar to match the hem.
And beaded fringe since I had almost the exact amount left over.
It's a sign!

Working on the neckline of the cape.

Close up of the beaded fringe being sewn on.
This was sewn on after the tulle & the casing for the drawn string around the neck.

Here's a picture of the casting loose.
It looks great if it's pulled up tight & around the neck too.

Here's a view of the back of the cape.
I think this is better being shorter?
Yes?
I like it because it's above the tulle' hem.
I feel like I need to add a shoulder strap...
A SNAKE STRAP.
With lots of bugs & insects hovering over the shoulder.
What can I say??
It's still winter in Alaska & I'm salivating for spring.
Can't wait to get the worm compost going.
Friday, February 8, 2013
Upcycled Wedding Dress Part 4 ~
The devil is in the details.
The base of the wedding dress is pretty much completed.
It's been cut, re-sewn, painted, dyed, & manipulated in many ways.
So, now comes the fun part of embellishment.

Beading & leaf action on the bodice.

A little beading trim.

A cape is always a fun accessory.
This was recycled from part of the skirt & has an iridescence purple lining.
Cokie Robert is always close bye her boy.
I had some of the leaf fabric left over so I added a hood.

I always love a hood for a bit of mystery.
Here's my reluctant son modeling the hood.
William, you're a good sport!
(I agreed to not show his face modeling the hood)
I think an extra scoop of ice cream is in your future!
Thursday, February 7, 2013
One of those days...
Ever have one of those days?

It's been a bit challenging today but I'm looking forward
to a Mom & Son evening.
There's a light beautiful snow coming down,
chicken soup on the stove & a bottle of wine in the fridge.
Things are looking up!
Tuesday, January 29, 2013
Upcycled Wedding Dress ~ Part 3
I'm back to working on the "Wedding Dress."
I had to get the kiln cleaned out & re-loaded with a slump firing,
go to Costco, clean the house & then get out the serger & sewing machine
so I could start to work on the "wedding dress."
I just had my 1970 Pfaff sewing machine tuned up & this little
girl sews like a dream. My "new" 1991 White serger...not so much.
It has a plastic body so it needs a lot of adjustment & re-threading
on a frequent basis when sewing. The White was the first machine I
ever purchased new. It was treat one year with my pfd ~
I think I spent $298 on sale at Riehl Sew & Vac.
It should go back to Riehl for a tune up ~ they can fix anything!
Before I could start to work on
the "dress" project. I needed to clean the studio & house...
I think it's like clearing the slate or
having a fresh start. It stills the mind & allows fewer distractions.

Although, sometimes there's little distractions afoot when you least expect it ~!

I spy a little bird...oh, wait ~ it's a shop rat!

So, after working for most of the afternoon on the "wedding dress"
I was able to add four layers of tulle on the bottom of the hoop skirt.
The tulle has some nice sparkle so it adds a bit of fluff & reflection.
I added a layer of "leaf" fabric over the bodice.
This was harder than I thought it would be but it turned out nice.
I was going to add the leaves on the back of the bodice too but
I think it would be too much...it has a better line on the back with the simple polyester.
So, I'm learning a little bit about the polyester.
It's very forgiving, doesn't wrinkle, repels spills, is easy to sew...
hmmm....maybe that's why this "wedding dress" was made out of polyester?
More to do...
Saturday, January 26, 2013
End of the Day Painting ~
It's the end of the day.
I've been checking things off my list...
year end accounting done ~ check
kiln cleaned out ~ check
kitchen cleaned & dishwasher loaded ~ check
copper cut for the next kiln load ~ check
working on the laundry ~ check
pizza dough made for pizza night ~ check
studio cleaned ~ No
dog brushed & teeth cleaned ~ No
inventory done ~ No
glass inventory & order complete ~ No
End of the day painting done ~ No...but I'm working on it.

So, I know this is sort of ugly but it's a work in progress.
I often have a canvas in the studio so I can add extra paint, beads,
glass, paper, etc. to it as the mood hits. This was a canvas that I gesso'ed (is that a word?)
over & then just added whatever paint I had left on the palate' over the course of a few days.
It's needs more layers of paint ~ over the base of some watercolor & acrylic.
I prefer working in oils as they are slow to dry so I can remove & add layers
of color & texture. I think I'll move on to oils now.
~ Thoughts? ~
Friday, January 18, 2013
Upcycled Wedding Dress ~ Part 2
The deconstruction has begun...
The 80's have met the scissors & the scissors have won!

The first thing I did was to cut off the outer layer of the polyester
tiered skirt. It was gathered at the waist so it is a LOT of fabric!
I cut the layered underskirt to a shorted length so it could serve as a sort of "base."
The fabric I have left over is voluminous & LOTS of lace.
The tulle "hoop" skirt has been shorted on top or from the waist
so it still works as a hoop to give the skirt some flare.
Did you notice the poofy sleeves are gone?
William has begged me for days to cut them off so
"POOF!" They're gone!
I made a pattern for a simple half circle skirt & ta-da!!!...
a cool over skirtin a botanical design that will be embellished with
over & under applique' with metallics.
I have a surprise for the bodice & more....I'm excited.
This is such a fun challenge.
I should be cutting copper but I'm playing with fabric & clay.
So much more to come ~!
Thursday, January 17, 2013
Upcycled Wedding Dress ~ Part 1
I thought I'd shoot a few photos of the wedding dress
before I started to transform it into....?
Here it is in all its 1980's fashion glory!
My friend, Sherrill, loaned me this cool mannequin she uses in her home to display
various projects & wearable art pieces.
She already had it wrapped with the cream fabric & the
tuff of tulle' on the top.
The hoop came with the lovely wedding dress so I slipped in on the mannequin.

The hoop fit fairly well & had a tie closure so it was easy to adjust.

Here's the dress displayed on the mannequin pre-any-modification.
It's a really great fit!
The dress is a 9/10 & it fit perfectly on the mannequin.
I have the mannequin on loan for the next month so
I better get busy!
I've got to find or make a mannequin so I have a
way to display my creation for the event.
Any ideas???
Tuesday, January 15, 2013
Transformed Treasures 2013 ~
As an artist, the Transformed Treasures fundraiser for the
Salvation Army is one of my favorite events.
Artists are given $50 in store vouchers with which to purchase
an item to transform into a treasure.
All the treasures are auctioned off a gala luncheon in the spring.
This year the Salvation Army is offering two challenges to artists.
One is a chair challenge ~ 5 chairs to be transformed.
The second is a wedding dress challenge ~ 5 dresses to be transformed.
I really wanted a wedding dress....and here it is!!

Good grief it's UGLY!!
I just assumed all wedding dresses would be made out of silk, charmeuse, or some such
quality fabric. These types of fabrics take a dye bath well if I wanted to change the color.
BUT ~ NO! This dress is polyester.
Polyester?? Really??
Who would buy a polyester wedding dress?
An if it's polyester why would it have to be dry cleaned?
Throw this puppy in the washer & dryer....which I might do just to see what happens.

Now I've got to re-think some of my original brainstorming ideas.
Let the challenge begin!
Monday, January 14, 2013
The Streets Are Like A Skating Ring ~
Literally!
We've had such warm weather that it's been raining for the
last 3 days. Rain on top of snow makes for glare ice conditions.

Our street is a skating ring! He's my son, Will, skating in the street.
The sidewalks are about the same & it's probably safer
to have your skates on than grippers.
Although I'm enjoying the warmer temperatures I'd like to be
able to be outside and go for a walk or ski.
Hopefully, we'll get some snow as the temperatures drop later in the week.
Looking at this picture I also noticed that Will has his jammie pants on & no
helmet. This is what happens when I work a show on the weekend!
Tuesday, January 8, 2013
Alaska Gift Show Spring 2013 ~!
It's Show Time!

Dena'ina Convention Center in Anchorage, Alaska.
I'm looking forward so seeing my customers from all over
Alaska & from Outside. My Reps, from
Taku Graphics, will be right down the isle. Retailers will be able
to look at samples & write orders for the spring & summer.
My web site is sporting a new look, too.
Check it out at ~
The web site is still under construction but I'm hoping it will
work as an on-line catalog of sorts for my work.
The blog will continue to be an outlet to showcase the
glass process, as well as, life in & outside the studio.
~ Show Hours ~
January 10th, 3 to 7 pm
January 11th, 10 to 6 pm
January 11, 10 to 5 pm