Showing posts with label fused glass. Show all posts

Saturday, October 26, 2013

Up-cycled Microwave Tray ~ 3rd try!

The microwave tray transformation continues with this
3rd installment.


This one has cast glass dragonflies, butterflies, & fish as well as
fused glass pieces, blobs & beads.

Most of the glass is transparent although some of the beads
are opaque & add some contrast.

It's been hanging in the greenhouse without any problems
with gravity & temperature.

Friday, October 25, 2013

Thursday, May 3, 2012

Peter McGrain ~ Glass Artist & Accordion Player

One of the classes I participated in while at the
Glass Expo was a glass painting class with Peter McGrain.
This is technique is described as
Vitri-fus'alle: a word made-up by Peter.

This technique incorporates fusing with traditional
glass painting used to embellish stained glass.
Think of the beautiful stained glass in European churches
and that's the influence & look created...with a modern twist!


(here are Peter's hands working on the light table.  I have more
pictures of him but he didn't answer my email for permission
to show them here so it's only his hands for now....)

Traditional glass painting uses the methods of
tracing and matting.  These are layers upon layers of
painted tints that are built up & then removed to create the
shading & highlights in the figures.

Here's my humble study via Peter McGrain.


Peter recommends using System 96 glass ~
I've been considering switching over to 96 vs 90 due to a variety
of issues so maybe this will clinch my decision.
I'm excited to play with this technique & see
where it goes.  Have lots of ideas rumbling around in my head.

Thanks Peter for an inspiring & fun class!
During the class I also found out that Peter is an accordion player!
I knew I liked him!

Monday, March 5, 2012

1st Grade Fused Glass Project ~

My son, William, is in 1st grade.
He loves to help in the studio & create his own glass pieces.
He's pretty handy around the studio & often helps me with my production work.

He loves his classmates & teacher so we thought we might like to share a
glass project with the class.  We decided to ask his teacher if she'd consider
 having the kids help create a fused glass platter as a
gift donation to the Anchorage Museum for the 2012 Gala ~ & she said "Yes!"


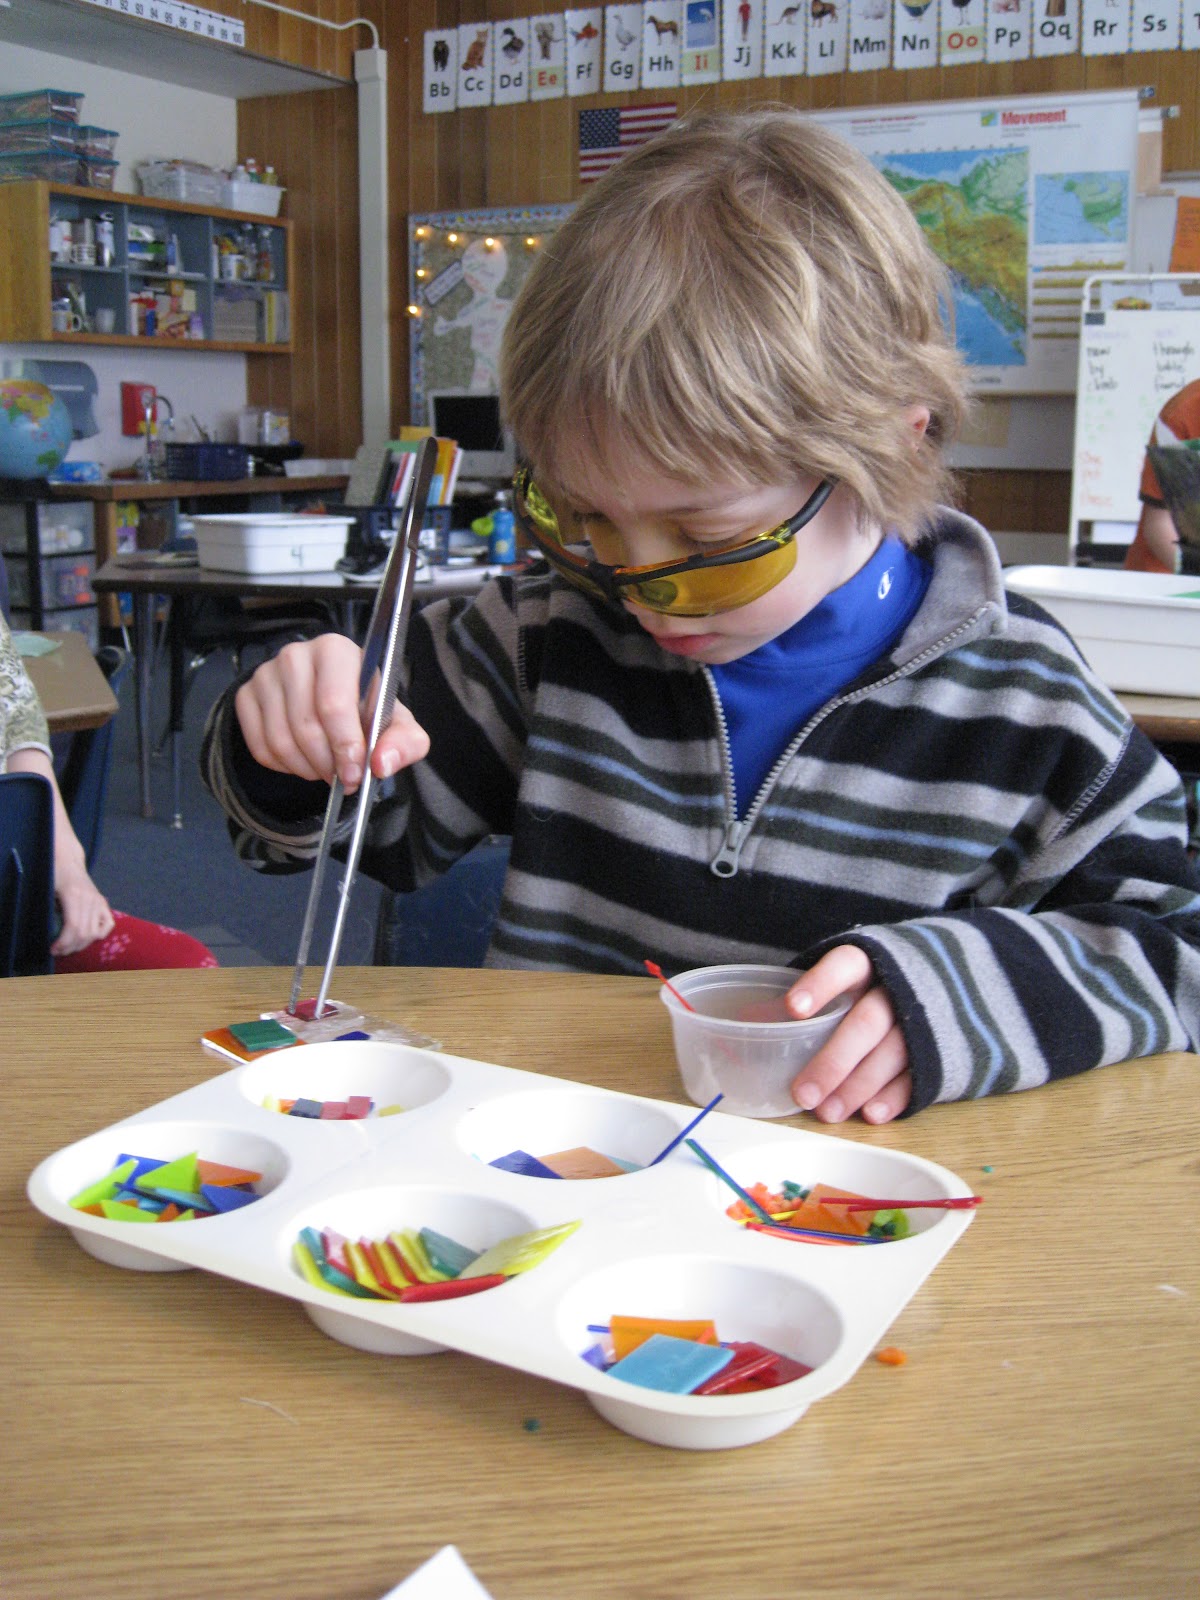
I pre-cut opal glass, primary colors, in basic shapes.
Each child received a 3 X 3 inch clear blank &
then had free rein to layer, sort, line-up, & create a pattern of their own design.

We discussed safety ~ thus the goggles ~ even though they weren't really needed
it's good to get used to wearing them ~ practice safety!
And the use of tools; safety, how to handle, clean & put away. 

In the studio, this is a must! 
Tools must be put back after use or there
becomes so much disarray that they can't be found & time is lost!
It makes me a little crazy...organized chaos is fine as long as I can find my tools.


And tweezers!  Kids (of all ages) LOVE tools!
I brought big & little tweezers, for picking glass up, & it was a big hit.
Again, not really necessary but the kids love to handle tools like this &
it's fun for me to see how they do ~ it varies quite a bit student to student.


As the kids completed their 3X3" squares I placed them in divided boxes
and labeled each square with their name.  Each child also completed a small magnet
& these were also placed in the same labeled space.
Here's a quick shot of the pieces as they were put together by the kids. 
After all the 3X3's & magnets were completed I transported them
back to the studio firing in the kiln.


I created a grid that was drawn on fiber paper so I could lay out the
3X3's & also make a map to keep track of each child's piece.


The grid is filling up....


Almost filled in with a balance of lots of color & some pieces with more "space."
White space is good ~ a little resting spot for the eye.
This helps to create balance in the overall design too.


Here's the glass blank pre-firing.
I decided to fire this at about 1419...below a full fuse
to get a little texture but still allow it to be used as a platter.


There was quite a bit of glass left over so I decided to make a
small platter for William's teacher as a thank you.
She's been a great teacher & open doing new things with the kids.
The kids love her!  Thanks Ms. G~!


Each child also made a magnet ~
I think it's important that they have something to take home to show
their family & have a memory of the process.
A little pocket piece.


Here's the piece post firing.

William got busy making a chart & placing the magnets on a display board.
A fun way for all the kids to look at every one's work.
And another helper peeking around Will....


Thanks Will!  Good job.


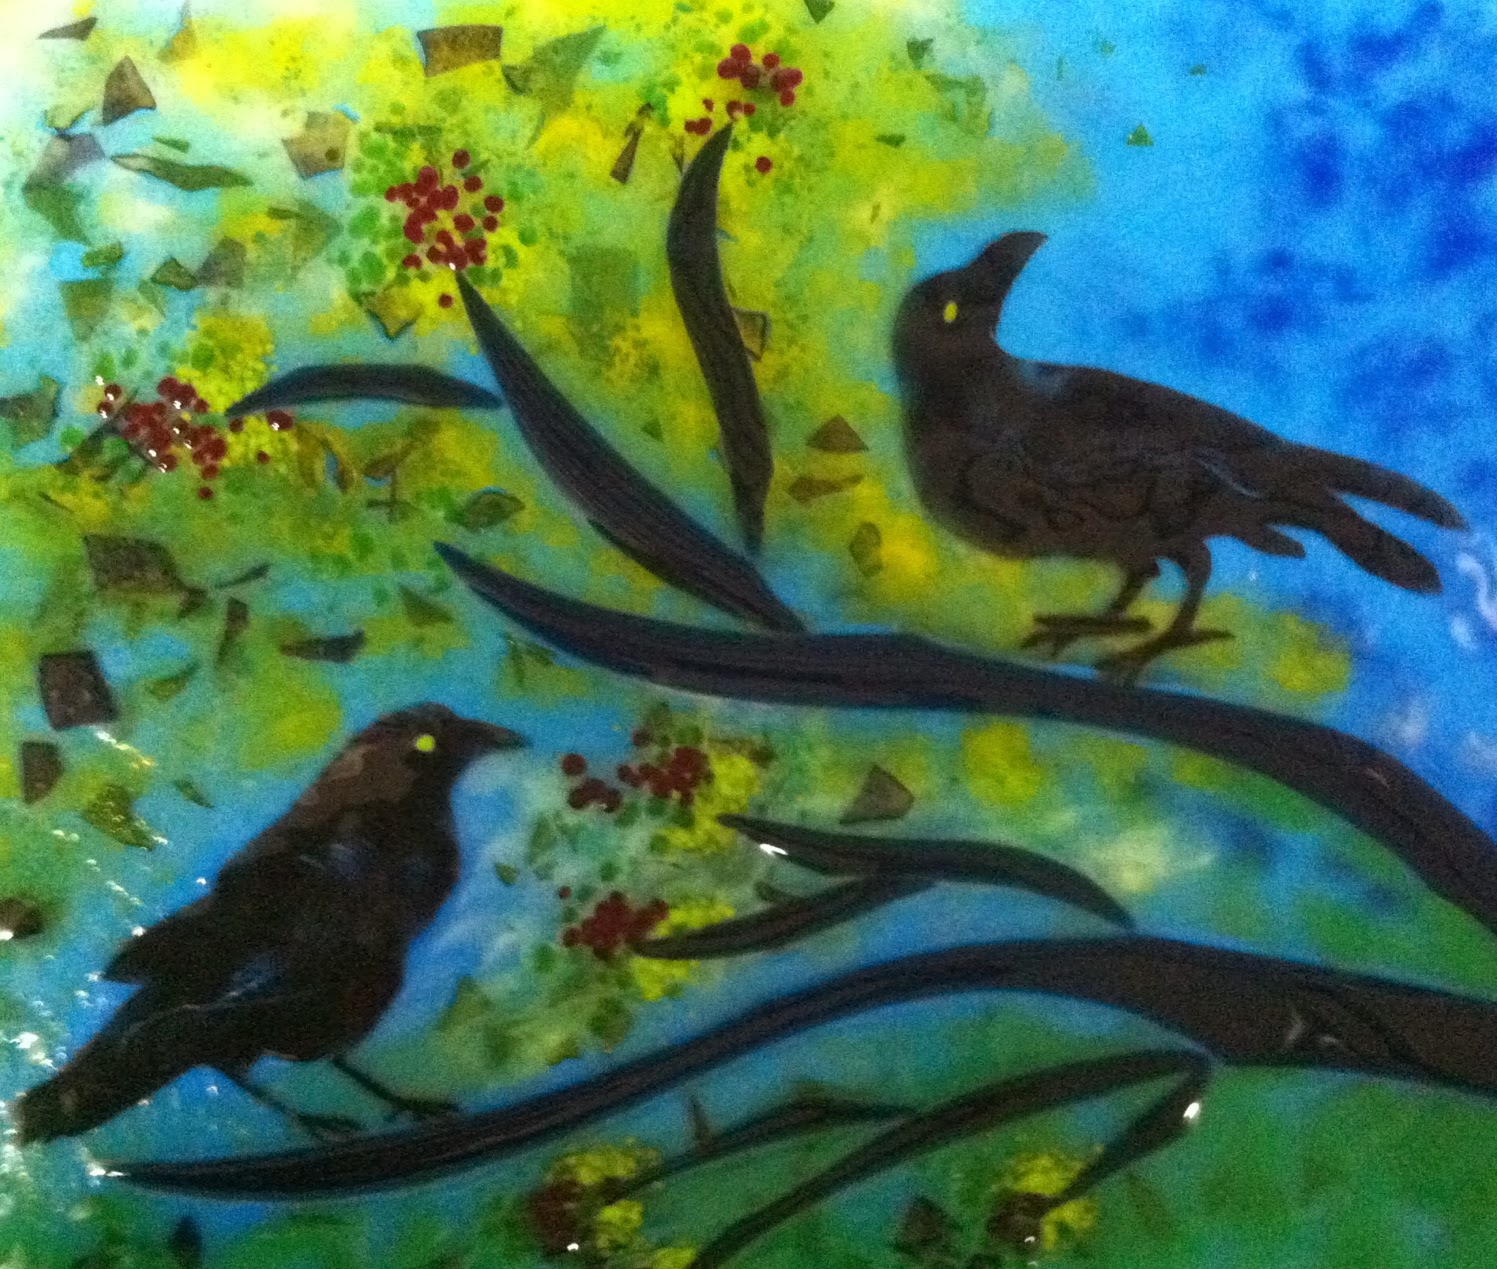
Here's the finished platter!
Size:  15" X 15"
Title:  Primary Colors

Thank You First Graders ~ you're amazing!

Now for the "Artist Reception" at school!

Sunday, March 4, 2012

More Aurora Ravens ~

More Aurora Series in the Ravens ~
Are you sick of it yet?


Each piece is different. 
Even if I use the same powders the watercolor effect looks different.
Glass is a liquid so as it heats up in kiln & melts it moves around a bit and flows
together creating a wash of color.


I've tried to cool the process down & not fire to a full fuse as a way
to get a little more texture in the glass.

That also seems to keep the images a bit crisper.

The ravens above are slightly more transparent probably due to less
powdered glass.  It's hard to judge how much has been sifted
onto the blank unless I weigh the glass first.

I think that's an unnecessary step.
No time for that!


Saturday, February 18, 2012

Aurora Series ~

I'm working on a new series of glass that I'm calling the
Aurora Series.

It's been a bit challenging ~ I'm still trying to get the colors right.
These are made  with many, many, layers of powdered glass.


I've been getting my opaques & transparents mixed up
which is not a good thing!
These have all been fired twice because I was trying
to intensify the colors.
I forget how washed out the transparents are when fired.
The beauty of them though is that they look like watercolor washes.

I think I need to paint these first ~ that seems to help get the colors
& the washes in the glass correct.

Thursday, January 26, 2012

Alaska Gift Show!

The Alaska Gift Show is over
but orders continue to filter in while 
catalogs & shipments are going out daily.


Even though the weather was horrible in Alaska & the Seattle airport was
closed my Seattle rep, Kathy, managed to fly into Anchorage (albeit a bit late).
 Some retail shoppers weren't so lucky & were stranded or delayed.
As a result, I've been getting lots of email orders & things are picking up
on WholesaleCrafts.Com.

Quick shot of my booth.
I had a nice compliment on my booth set-up from my friend Skookums.
Skookums is an amazing & well-known harpist but
her other job is to rep a few well known Alaska artists.
It was great to see her ~ I should have gotten a picture of the two of us!

Anyway, she liked my booth set-up.
I usually set it up so it's a bit askew..
.to createa triangle. 
 I have a small table & two chairs facing the booth so
my shoppers can sit & look at all the samples while we chat & write up orders.


Taku Graphics is one of my neighbors.
They rep an amazing line of famous Alaskan artists including
Ray Troll, Karen Beason, Teresa Ascone, & now ME!


This beautiful peacock was residing in the booth next door to mine.
It belongs to Lynn of Horse Island Traders from Juneau, Alaska.
 Lynn is one of my favorite booth neighbors ~ full of positive
energy & kind to everyone.


Kathy & Lynn comparing notes!
I think Kathy was buying some samples?


Lynn placed this stunning beaded peacock between our booths
& it stopped shoppers in their tracks. 
It helped to pull people into her booth & mine.
What a conversation piece!
Shows over but the now the work begins!
Las Vegas is next!


Wednesday, December 7, 2011

Glass Bathroom ~

Whew!  The bathroom project is completed.
Here's a shot of the vanity back splash.
This is a mix of tiles that were cut down from the
 larger tiles used for the tub surround. 


The counter top trivet was also made from small left over
glass pieces.  I put bumpons on the bottom just to keep
it from sliding on the counter top. 
Love the purple-blue counter top~ it picks up the
neo-lavendar glass & is a good neutral with the other colors.
This is the coordinating tub surround.  It's flanked with
6 inch white tiles for a high contrast look.
The blue strip (3mm) was added after the 6 inch tiles for a
three dimensional and finished effect.


This is the finished piece from the previous post. 
It's a very large piece with all the shapes hand cut, layered
and then tack fused with an extended annealing period.
It'll be mounted about 2" out from the wall on brushed
nickel mounts.  The brushed nickel mounts match the
bathroom fixtures.

The paint color in the bathroom is white and the lighting is halogen
but there's also a glass block window there's plenty of ambient light.
Mounting it away from the wall will allow the glass to transmit
light & color.  Can't wait to see it mounted!

Monday, December 5, 2011

Glass Puzzle ~

Often, when I'm working on a large glass piece for a home installation
I start with a couple of color palates & then make up sample pieces.
It gives the homeowner & myself an idea of how the glass colors will look
in the home.  Light, both artificial & natural, is of utmost importance.

There's lots of variables such the wall color  (which is easy to change),
the natural light (not so easy to change) &
artificial light within the space (a possible
option to change) & how all of these things interact
with the glass.


These are left over pieces from a bathroom tub & vanity surround.
They are all 2 layers of 3mm glass which after fusing are 1/4" thick.
Some of these were cut down into strips & other patterns to create a
variety of sizes, patterns & shapes.
The tub & vanity glass has a specific pattern
(photos on that to follow). 
                   

There's a base piece of 3mm Tetka glass (24" X 48")
& the beginning of the layout on top
It's a bit like putting a puzzle together ~ trying to fit
pieces together & coordinate colors for an abstract look. 

These are thin strips that were cut off the edge of larger tiles.


Here's the thin strips used as fillers for a more random feel.


Here's the beginning of a big project.

Thursday, December 1, 2011

UAA Crafts Fair ~


Please join me for my last event of the year!
~ Another favorite event & only 1 day ~


Booth number 43 in the student union cafeteria!
Lots of sale items & close-outs for the holidays.

As a UAA Alumni I'm happy to support the University
& love being back on campus...minus the homework!

See you Saturday!

Monday, November 14, 2011

Man...Stop the Snow!

We've had over 15 inches of snow in the past few days!
While my husband & son shoveled us out
I worked overtime in the studio in anticipation of the upcoming
Crafts Emporium!!

Can you guess what inspired this piece??

I'm working on lots of new work & also dyed-up some beautiful
cut velvet scarves.

Crafts Emporium
November 19th & 20th
Dena'ina Convention Center
Anchorage, Alaska

See you there!


Saturday, March 12, 2011

It's Spring!


The sun is out & I'm planting seeds ~ in more ways than one!
This is a set of patterns I'm designing for a new line of dinnerware,
votive holders, & an interior fireplace surround...maybe

 It's in the planning stage.

What do you think?

Saturday, January 15, 2011

Story Boards in Fused Glass

 This is really a post about recycling Bullseye.

Bullseye glass is my favorite glass to work with for fusing & other glass processes.  I order glass by the hundreds & thousands of pounds & everything arrives carefully packed between layers of paper in wooden crates.  As a result I have lots of paper, wood, screws from the crates, shredded packing paper & more!


One new thing I played around with during the holidays was creating "story boards."  I've made these before but decided I'd recycle the wood from the Bullseye crates.  First disassembling the crates, cutting the boards in strips, painting the strips of wood & problem solving a hanger or hanger slot for the back.  I still haven't worked that out so if anyone has any ideas please post a comment.  I thought about using a Dremel with a router bit? 
Think that would work all you wood-working experts?


Here's a close up of one "page" on the story board.


Here's the basic idea of the story board wall plaques.  These are small but I like to work bigger using a whole board from the crate.  They look nice hung in groupings.  These of course have Alaskana images on them as I'm comtemplating the Alaska Gift Show that's coming up this next weekend.  I think these are still in the idea phase & not polished enough for wholesale/resale market but maybe next year?

Sunday, January 9, 2011

Anchorage Museum Gala ~ Donation Time!

Every April the Anchorage Museum hosts its Annual Gala.

We're lucky to live in a city that has a museum that brings exhibits such as "Star Wars," "GOLD," "Andy Warhol," & this spring a collaborative exhibit with the American Museum of Natural History called "The World's Largest Dinosaurs."  Of course it takes lots of money via memberships, sponsors & fundraisers to bring such blockbusters to Anchorage.

Here's the piece I'm donating to the "Gala" party 2011.  Check out the Anchorage Museum site for current & upcoming exhibits!  See you at the Gala!!


Size: 16" X 22" finished in iron stand
Materials:  Bullseye Art Glass, iron oxide text transfer process,
kiln fired at 1500 degree Fahrenheit

Thursday, November 18, 2010

ARTS EMPORIUM ~

Please join me this weekend for the
Arts & Crafts Emporium
at the De'naina Convention Center in
Downtown Anchorage, Alaska!


The show hours are Saturday 10 am to 6 pm & Sunday 11 am to 5 pm.
I'll be showing current work including the new red "Magic 8 Ball" platters, sterling & dichroic set rings, dinnerware, jewelry, ornaments, & more! Something for everyone on your holiday list!
Please stop bye & say "hello!"

Friday, June 18, 2010

Artist in the Park! (Part 1)

My family & I had a fabulous time in Denali Park! It was pleasure to be able to share my work with the visitors & the park staff. You know you're in the wilderness when you see signs like this posted all over the place. We were tent camping so seeing these signs in the campground were a little worrisome. Bears like to hunt the calves ~ yum! Fresh & tender meat!


It's late spring so the moose cows have little calves. We saw cows & calves all over the place! Lots of twins & triplets like the ones below. See the hair on the mom's back standing up? She knew we had pulled over in the truck & were watching them....
she was trying to herd the babes up & kept looking at us over her shoulder.


The Mom & trips were right around the corner from the McKinley Chalet
where I was invited to chat it up with the visitors & educate the staff about my work & techniques.

Education helps to sell the work.
I haven't done much in the way of retail selling in a while
so I was looking forward to the experience.

This was a beautiful building & the gift shops were amazing.

Here's one of the displays of my work.
What a great idea to put it in front of the window so the light can come through the window.

They asked me to set up a display table with more of my work. I also brought books, literature & handouts from Bullseye Glass & samples of fusing techniques. The glass samples were a big hit! Everyone liked to hear about the different fusing schedules & learn about the different look of glass fused at different temperatures.


A growing crowd with brisk sales! What fun! The visitors also kept asking me about the sculpture behind me ~ like I knew how it was made or installed??? One lady keep insisting that it was a natural wonder & the building had been buildt around the rock. (hee, hee) I told her I thought it was plastic & she about had a heart attack.....kidding!!! I was only kidding!!


I had to take a picture of the SIGNAL LIGHT in the intersection right outside the McKinley Chalet. Can you believe it???? A signal light!

Wow...I guess they do get a lot of traffic in the park in the summer.


If you look closely at this picture you'll notice all the buildings on the left side of the Parks Highway. It's a strip of assorted log cabins & shops. A number who carry my work. The grizzly sculpture below was outside Summitt Gifts. It's a quaint shop filled to the gills with Alaskan kitch & handcrafted gifts. The grizzy is lifesize at about 10 feet tall. Can you image being a 5 year old & running into a real-life bear this size????


At the end of my work day we went on a little hike along Riley Creek. What fun to jump from rock to rock....and stand on this gigantic boulder.
And pick up sticks.

And head back to our camp site for dinner.