Sunday, April 26, 2009

The Great Sunflower Project


I just received my free sunflower seeds from The Great Sunflower Project this past week. (See my 2/16/09 post describing this project)

I have raised garden beds for my vegetables but this year I'm cutting way back on the vegetables. I've purchased a produce subscription through Arctic Organics based in Palmer. For one fee, you receive a variety of organic, locally grown, vegetables every week! And the best part is that their delivery area is only a couple of blocks from my house so every Wednesday Will & I can go for a walk & pick up our vegetables.

Arctic Organics provides new & unusual vegetables & with every delivery you also receive a newsletter identifying the contents & recipes to give you ideas for meal preparation. I love this! It's the main reason I wanted to grow less vegetables & more sunflowers this year ~ I'm in a rut with my garden....little gardening joke there!

Anyway, back to the Sunflower Project. I thought I would plant one large raised vegetable bed all in sunflowers. The sunflowers for the project have to be Lemon Queen so I'm going to plant most of the bed in that variety but also include some miniature & ornamental sunflowers. It should look striking & hopefully the bees will appreciate the pollen.

The bees....yes, that's the point of The Great Sunflower Project. It's basically a research project to collect data on when, where & how long you see bees visiting the sunflowers. Seeing no bees is important too. I don't think that will happen since I have two bee hives in my yard & they love my garden & fruit bushes/trees.

I'm hoping to have a set time every day or week when Will & I do our bee counting in the garden. Hopefully we'll be able to get some good photos too. Maybe have a cup of tea, a couple of cookies, & count bees...all in the name of science!

Sunday, April 19, 2009

Production Work

It's spring time in Alaska & if you're an artist who sells your work to galleries (like me) you know what this means....it's production time! The tourism season is right around the corner & galleries & shops all over the state are gearing up, sprucing up & getting for the summer season.


It's always on my mind...I've got to get to my studio & get to work. It reminds me of this poster by Fred Babb. It's my mantra this time of year...go to the studio & work, make stuff, get into the groove, um mm...


You know the groove where you're gathering materials...


With a smile on your face...


Deep in thought, start creating your masterpiece....


Experimenting & trying new techniques....


Ahhhh....Sweet success!


OK ~ Here's the real thing ~

Here's a load of glass ready to become magnets, buttons, & other small fun collectables.

For the most part, these have Alaskana images. When I've ventured off into other realms it doesn't sell & I can't afford to stock pile images of skeletons, modern art, & abstract images, you know...the stuff I really like. If you want to survive as an artist in Alaska you have to produce work in what I call the "big three"...bear, moose & fish. That's another whole subject.

.

Image this... there's whole stores in Alaska that only sell Alaska Christmas ornaments! Here's a peek at some of those.


OK ~ back to the studio groove....

namaste'

Saturday, April 18, 2009

Bee Check ~ a day later

It looks like the bees are making themselves at home! Here's a guard bee at the upper entrance keeping watch.


As we watched more bees were alerted that we were present & more came out to see what was going on & if re-inforcement was necessary. We're friendly...we promise!


Here's a photo of the hive & the bees coming out the upper entrance.

My beekeeper assistant also keeping watch...Who's watching who???


Friday, April 17, 2009

Bee Installation 2009

My two, four pound, packages of bees arrived yesterday so it was important that they be put in their new homes quickly so that they didn't get chilled or hungry. My son (4.5 yo) is my assistant beekeeper & photographer. Unfortunately, we only took a couple of pictures & the camera shut off because the memory card was full! I had planned to take step by step photos of the installation but that will have to wait for another time.

I already had my hive boxes cleaned out & ready for the new bees. I also have some frames full of honey from last year so we cleaned up the frames & put some those frames in the brood box. The bees will love this~
Here's me leaning down to pry the can of syrup out of the temporary hive / travel box. The queen is inside in a small cage that I needed to remove after pulling the can out. I put the queen in a pocket on my green garden tool belt. My husband gave me this garden tool belt a number of years ago but I never really used it until the past couple of bee seasons. It works great as a tool holder after I'm suited-up.
Here's the junior helper checking out the new~bees!
The spray bottle has warmed sugar syrup in it so I gently spray the bees before I dump them into the prepared hive. The sugar water calms them down & they get distracted because they lick the sugar off of themselves & each other ~ slick, uh? I used to use smoke but I don't use it on a regular basis. Sometimes mid season I might use it as an alert to the bees that I'm going to open the hive but early in the season it just seems be an agitator.
Well, dumped the bees into the hives, added the honey filled frames & feeder on top & closed the hives-up.

Thursday, April 9, 2009

Chango Spasiuk ~

You're probably thinking "what is a Chango Spasiuk?." Chango Spasiuk is an accordion player ~ a fabulous accordion player. This past week the New York Times gave his new CD, "Pynaadi': Los Descalzos" (World Village), a rave review.

I first heard his music a few weeks ago on National Public Radio. His new CD was reviewed & a number of the cuts played. I like to listen to NPR during the day while I'm working in the studio & my ears perked up when I heard the accordion music & then I got hooked on the review & the interview.

Chango is an Argentine accordionist & the grandson of Ukrainian immigrants. He grew up on "Chamame" which is a musical style from the region where Argentina borders Brazil & Paraguay. He plays with a quintet including violin, cello, guitar & percussion. Some of the cuts include vocals.
It's a great CD ~ check it out!

Wednesday, April 8, 2009

Glass on the edge ~ part 2

Here's a work in progress. I left the mold out on the cutting table & slowly filled it with cut glass strips as I was working on other pieces. There's two different colors of green ~ lime green & turquoise green ~ in the color strip through the center.


I have bins of clear glass so I'm concentrating on experimenting with what I have a lot of...and thank goodness is one of the cheaper glasses. Here's a close-up of the strips. It looks like an abstract painting ~ cool!


Tuesday, April 7, 2009

Accordion Art

Here's a quick photo of another of the accordion cases that I'm embellishing. The large skeleton picture is actually part of a poster that I had in storage. I have a more art than I have for the walls in my house & I'm tired of storing it ~ I want to enjoy it!

So why not cut it up & decoupage' it on my accordion case? I can enjoy it everyday & have a bit of art with me when I'm traveling with my accordion. I have gotten funny looks & questions though like..."wow, what's in the suitcase?" & "are those skeletons?".

OK ~ I'm off to practice for my lesson!

Wednesday, April 1, 2009

Glass on the Edge


Here's a new glass technique inspired by Cynthia Morgan a glass artist in Portland, Oregon. She's a casting & warm glass expert who is very open & willing to share her techniques. When I left a comment on her blog she left me some very helpful suggestions regarding open casting using Luminar ~ a material that I've had in the studio & hadn't had time to experiment with in the past. I believe she's in the process of moving her studio so some of her recent posts have been about having a glass garage sale & using up all the scrap glass she's accumulated.
Glass scraps are like fabric scraps if you're a quilter or paper scraps if you're a scrapper. It's hard to throw away even the smallest piece of material but as you are working more & more pieces are created. Then there's the dilemma of how to store & organize all these small pieces??? I could relate to her comments about the volume of scraps she had in her studio & her upcoming move since I had just moved my studio in January. I had large plastic bins (& bins & bins) of scraps all organized by COE, color & transparency, & thickness. These bins were HEAVY & I actually thought about tossing a few of them into the dumpster but I knew I'd regret it later so when the moving guys were in the studio moving all the heavy furniture I had them move the scrap bins.
I'm all about using up my glass bits & pieces so I thought I'd play around with this a bit. It's like putting a puzzle together or piecing a bargello quilt. Quite time consuming but meditative & calming. I decided to set-up a prepared mold or two on the cutting table & randomly fill them with scraps as I was cutting glass for other pieces.
I started by choosing a standard 3mm thickness of glass that I would use throughout this project. Then cutting the glass into thin strips of about 1/4" wide. After I had a small pile of strips I put them on edge & started stacking them together & alternating where they started & stopped ~ sort of like putting in a wood floor. Alternating the strips would ensure strength as they fused together during the firing.
I had decided to use clear Tetka as my primary color with a strip of fractured white for interest. I worked width-wise & length-wise as I went & occasionally would push a whole length down to adjust the design pattern or placement of the strips. The mold I chose worked well as it is an elongated oval & has a gradual dip into the bottom. An easy shape for a first time process ~ I'm all about success & reinforcement for myself!
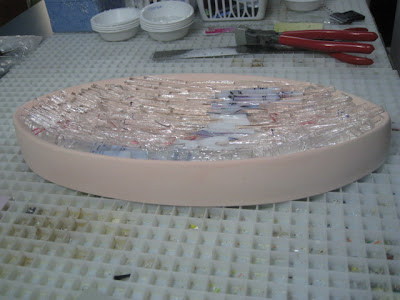
Here's a look at the filled mold prior to the firing. It looks pretty already! You get an idea of how the edges of the clear glass will reflect the light. The photo below is a side shot of the mold & gives a little perspective of the depth of the piece. It's subtle.
Ready for the kiln. I used a tackfuse schedule but modified with a longer annealing time. For a schedule like this I usually start the kiln at night so it runs at night & then has a gradual cool-down. That way I'm also not tempted to open the kiln early to check on things & risk shock.
I think the end result is cool & I love how it looks & feels. It has possibilities for sconces & components for sculpture but for now I'm going to finish filling up the other mold on my cutting table. This is addictive.