
Here's a new glass technique inspired by Cynthia Morgan a glass artist in Portland, Oregon. She's a casting & warm glass expert who is very open & willing to share her techniques. When I left a comment on her blog she left me some very helpful suggestions regarding open casting using Luminar ~ a material that I've had in the studio & hadn't had time to experiment with in the past. I believe she's in the process of moving her studio so some of her recent posts have been about having a glass garage sale & using up all the scrap glass she's accumulated.
Glass scraps are like fabric scraps if you're a quilter or paper scraps if you're a scrapper. It's hard to throw away even the smallest piece of material but as you are working more & more pieces are created. Then there's the dilemma of how to store & organize all these small pieces??? I could relate to her comments about the volume of scraps she had in her studio & her upcoming move since I had just moved my studio in January. I had large plastic bins (& bins & bins) of scraps all organized by COE, color & transparency, & thickness. These bins were HEAVY & I actually thought about tossing a few of them into the dumpster but I knew I'd regret it later so when the moving guys were in the studio moving all the heavy furniture I had them move the scrap bins.
I'm all about using up my glass bits & pieces so I thought I'd play around with this a bit. It's like putting a puzzle together or piecing a bargello quilt. Quite time consuming but meditative & calming. I decided to set-up a prepared mold or two on the cutting table & randomly fill them with scraps as I was cutting glass for other pieces.
 I started by choosing a standard 3mm thickness of glass that I would use throughout this project. Then cutting the glass into thin strips of about 1/4" wide. After I had a small pile of strips I put them on edge & started stacking them together & alternating where they started & stopped ~ sort of like putting in a wood floor. Alternating the strips would ensure strength as they fused together during the firing.
I had decided to use clear Tetka as my primary color with a strip of fractured white for interest. I worked width-wise & length-wise as I went & occasionally would push a whole length down to adjust the design pattern or placement of the strips. The mold I chose worked well as it is an elongated oval & has a gradual dip into the bottom. An easy shape for a first time process ~ I'm all about success & reinforcement for myself!
Here's a look at the filled mold prior to the firing. It looks pretty already! You get an idea of how the edges of the clear glass will reflect the light. The photo below is a side shot of the mold & gives a little perspective of the depth of the piece. It's subtle.
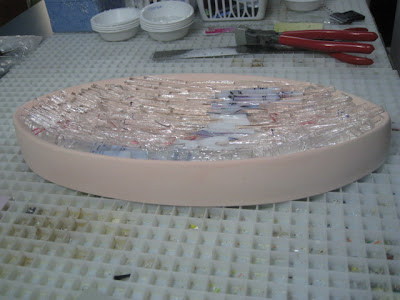
Ready for the kiln. I used a tackfuse schedule but modified with a longer annealing time. For a schedule like this I usually start the kiln at night so it runs at night & then has a gradual cool-down. That way I'm also not tempted to open the kiln early to check on things & risk shock.
 I think the end result is cool & I love how it looks & feels. It has possibilities for sconces & components for sculpture but for now I'm going to finish filling up the other mold on my cutting table. This is addictive.

 A close-up detail of a window...pre-firing. The dichroic accent is a face of a child. When fused, the clear glass will melt into the black glass underneath & all you'll see is the sweet child's face.
  Detail (below) of a steeple shaped roof. I thought about putting a skeleton in the attic but then found some old sample florals in dichroic glass. This floral is perfect because it was a mistake too. The background dichroic should have been removed instead of the image dichroic. A very costly mistake which is why it's still in the dichroic glass drawer.
  Here's the final project after a full fuse (1500 degrees). It might be fun to add more elements & fire again at a lower temperature to add some dimension. This piece is BIG! It measures about 2 feet in height & 2.5 feet wide. I have it in my garden window in my kitchen with a few plants around...landscaping of sorts!
 I started by choosing a standard 3mm thickness of glass that I would use throughout this project. Then cutting the glass into thin strips of about 1/4" wide. After I had a small pile of strips I put them on edge & started stacking them together & alternating where they started & stopped ~ sort of like putting in a wood floor. Alternating the strips would ensure strength as they fused together during the firing.
 I think the end result is cool & I love how it looks & feels. It has possibilities for sconces & components for sculpture but for now I'm going to finish filling up the other mold on my cutting table. This is addictive.